The Ardennes: the forest surrounding Bastogne, Belgium and a critical battle location during World War II, wherein the endurance, perseverance, trust and sheer stubbornness of the Allies defeated a seemingly unbeatable enemy. For me, an allegory for the Christian life.
One of the things I discovered during my sabbatical way back in 2009 is that there is a certain peacefulness and healing that takes place in my soul when I work with my hands. And a certain chaos in me when I don't feel like somethings looks or feels the best way that it could.
Let me introduce you to the kitchen cart.
Original Cart
Tons of dings and scratches
Towel rod and grate
When we bid on the house, we asked that we be able to keep it. At the time, I didn't look too closely at it nor really mind it's appearance. It fit with the decor of the house and was sturdy and practical. I love sturdy and practical.
But as I've slowly repainted the interior of the main floor of our home, it has increasingly felt out of place. The sliding bins stopped working well and it became a dumping ground for all the papers and "stuff" that really belonged elsewhere. It's also looking decidedly banged up. I hit the point recently where any time I came near it, I cringed. It just wasn't working anymore.
As many of my projects do come at me out of the blue, one day I realized this would be an incredibly easy fix. A little paint, maybe some creative touches and rather than spending hundreds of dollars on something that might match, I could have something cute AND the distinct pleasure of having used my nail gun. That is always a win.
So, I began to take it apart. Pulled out the rickety old towels holders. Punched out the wicker side grates.
I filled in the holes left from the rods and sanded the whole thing down
Holes filled in
Whole cart sanded and ready for magic
Of course, gave it a fresh coat of paint on the bottom.
I decided that for the top, I would go for a hazy, distressed type of look. I sanded off all the old stain which left me with a soft, yellowish pine. I treated it with some wood conditioner and then put two light coats of dark grey stain on top. Then I used some gray paint and a rag and just lightly covered all that followed by two coats of poly. I LOVE the finished product. (You can see it at the end!)
Once all the paint was done, I had to fill in the missing side grates. I had a picture in my mind but wasn't actually sure what I was looking for until I ran into it in Home Depot. Aluminum sheeting. Yes. Looked around a little more until I found just the right design and with some careful measuring and cutting with Tin Snips and then some tricky arm acrobatics to get in there with the staple gun, I had new grates!
Aluminum Sheeting
Measured piece of cardboard
Tin Snips
Staple Gun
Cut and ready for the cart
Installed
I pulled out some candles I have and an old vase I had painted a few years ago, filled up one of the slots with cookbooks that have been hiding (unused) in the back of the cabinet, repurposed a basket to hold diapers and found a cute little pop of color at Target to hold my kitchen towels.
I am thrilled with the results! What used to feel like an out-of-place, somewhat functional cart now feels bright, cheerful and useful.
There was clearly no question of how we were going to celebrate our Harry Potter-loving child turning 11. We've know for a year that this year would be the year we had a Hogwarts party.
And friends, this is when the internet pays off. Yes, we came up with some ideas ourselves, but we also had a ton of fun looking through different ideas and getting ready together for this party.
So, without further ado, I present to you our Very Potter Birthday.
First, we sent out the invitations. Each one individualized, printed on parchment paper and sealed with a wax seal. (And big thanks to my friend, Kim, who happens to own a wax stamp with the letter "H", thereby making this a very cheap project.)
Next it was on to planning the day out. We knew we wanted to have the guests arrive in style.
Josh greeted them at the door and let them choose a fun name tag for the day. We printed out a lot of the major characters and added a little Hogwarts Crest in the corner. The kids loved choosing who they would be.
Next, I (as Professor McGonagall, of course), offered the kids a sweet treat from Honeyduke's Sweet Shop while they waited for other guests to arrive. Click here to find the recipe we used to make these Acid Pops.
Next we had fun bringing the kids through the front door which we had fashioned to look like Platform 9 3/4. I had a lot of fun with this one. Used a white sheet, a bunch of paint, a sponge and voila, which was an idea I got from this You Tube Video. As they walked in, we had the sountrack to the movies playing in the background to add a little ambiance.
After the kids came into the Wizarding World, I ushered them into our very own version of Ollivander's Wand Shop. I blindfolded each kid in turn and they were chosen by a wand, which they were allowed to keep as a party favor. They were pretty excited about this!
To make the wands (because goodness knows I was not about to buy 10 wands), I used this awesome tutorial. The kids were all pretty impressed and wanted to know how I had made them. And any project where I get to use my glue gun gets me pretty pumped.
Next we headed downstairs to let Oliver Wood tell us how to play Quidditch. We played the three minute scene from the first movie where he explains the game to Harry. Then we split the kids up into two teams, Gryffindor and Hufflepuff. They got really into this and we had three awesome games of backyard Quidditch!
After Quidditch, the kids took a break and fed Scabbers. (Really, this is our guinea pig, Loretta, but I couldn't resist.)
Reading Clues on the Horcrux Hunt
Next, it was time for the Horcrux Hunt. This was something we came up with on our own. I wrote out two sets of six rhyming clues each and hid a locket and a ring. The kids raced each other as teams to see who could find their Horcrux first. Again, they loved this!
By now the kids were tired and hungry, so we settled down to eat in the Great Hall.
Josh and I came up with these floating candles. He covered empty paper towel rolls with white duct tape. I mod-podged it to make sure it stayed on. He cut little pieces of cardboard out and placed them just inside the tube, held tight with hot glue. We punched two holes and threaded white thread through and attached them to the ceiling. Then we turned on electric tea lights and rested them inside on the pieces of cardboard. It was a really neat effect. We then just scattered more electric tea lights around the room and lowered the lights. We put up the four House Crests on the window, which added a nice touch.
I also had fun making these authentic Butterbeers! I used this recipeand filled these bottles that I had covered with a free printable and mod podge. So easy and they loved it. I let them keep the bottles as another party favor.
We followed the meal up with these fun Wizard Hat Cupcakes to round out the party.
Though the best present in the world would be my ability to actually make Hogwarts a real place, we settled for this party and I think his smile says it all :)
Given my middle child's recent obsession with Daniel Tiger's Neighborhood, I am lucky my head hasn't yet exploded from having the theme song on a continual stuck loop in my head. Seriously...stuck there ALL. DAY. LONG.
But today, it felt a little bit like reality.
Some of you might remember that when we moved in here we saw a long list of yard projects looming before us. About a month ago, I decided to tackle the never-ending hedge that was attempting to take over the road on the side of our house. Rather than pay $1000 to have the hedge removed or severely trimmed, I decided to make it into a row of trees.
I'm not going to lie. I'm pretty pleased with my thrifty plan that turned out to actually look rather stately.
Used to be an overgrown hedge, now a tree lined street!
But the saving of the money in cutting them down also meant that I was left with a backyard full of tree limbs. TONS of tree limbs. And our county doesn't have any kind of limb or leaf pickup. (Really, Chesterfield?)
Last week I called a tree company to get an estimate on hauling all the limbs away. $350 to load up a truck, my friends.
Seeing all my hard work on saving money quickly slipping away, I tried to reason that this was at least still significantly less money than having that company trim or pull them out.
So.
I happened to mention this to a new neighbor who is fast becoming a good friend (and whose son is my son's playmate just about every day now and has thus made my day.)
Her reply?
"STOP. Don't do it."
And within minutes she had arranged for us to borrow a different neighbor's truck. His words to her when she explained what I was going to do to take care of the limbs: "We don't pay for stuff like that on this corner."
Well.
We said "yes" to that generously offered truck.
And then this morning, my neighbor shows up with my favorite starbucks drink and her work gloves and we go to town on that backyard. Together. Within hours, we've hauled a whole load to the dump and reloaded the truck and trailer. Most of the work was done while my littlest slept and my two older ones were at school.
Loaded up and ready for a second run to the dump
And the bonus to a now-cleaned-up backyard? Getting to enjoy my awesome neighbor's company while doing a job that feels very rewarding.
Were we the only two women at the dump mucking out a trailer? Yep.
Was my minivan the only one there? Of course.
Was my toddler the only baby watching a load of people empty backyard waste into a huge pile and loving every minute of said entertainment? Darn straight he was.
You see, friends, neighbors are pretty awesome. This is the fourth home we've owned. Every time we move, we pray hard, hoping that our new neighbors will be as awesome as our old ones. And each new place, we encounter a totally different set of people who surprise us in new and tremendously beautiful, human ways.
So, here's to my new neighborhood. To their generous and fun-loving spirits. To their smiles and welcomes and trucks and attitude that says "we are family when we live next door."
Richmond, keep up the lovely surprises. Perhaps God was planning some redemption for us here all along.
After moving a number of times over the last few years, we had two non-negotiables in this place that we are hoping will be THE home for the long haul.
(1) A circular layout so our inexhaustible children could literally run laps around the house.
(2) A room we could make a play/work room. Toys, desk, color, art. A place they could call their own but that could grow and change in it what it needed to be. When you've got an almost 10 year old doing homework while a 1 year old plays, you need a room with some versatility.
One of the practical things about being at a stage in life when formality and elegance isn't at the forefront, is that we were able to look at houses that had "formal dining rooms" and see them for what they would most likely be for us: the playroom. Because let's be honest- my kids LOVE to eat, but ain't no way we are trying to have any fancy dinners around here and our eat in kitchen is just right for our style.
So, when we found this house and our offer was accepted, I started dreaming about what I could create for my boys. I had found a color scheme I loved when I was fixing our Wisconsin house up to sell and I thought I'd stick with it. Cheerful, fun and isn't just "kiddish" but can fit in with the rest of the main floor.
So, the transformations...
Formal living room BEFORE:
Green walls and ceiling, some seating areas and bookshelves.
Formal Living Room from Listing
Formal living room AFTER:
Our Music room: soft grey walls, white ceiling and a place for our baby grand because why wouldn't you want live music next to where your kids are playing? We have a great room off the kitchen for our couch and tv and place to hang out so we really didn't need another formal space to sit. (Shout out to my in-laws for helping paint the white ceiling in the frantic days before the baby grand arrived off the truck.)
Formal Living room turned Music Room : Eventually when my younger ones don't torture
the guitars, they will be stored here as well.
Formal dining room BEFORE:
Beige walls on top, black floral wallpaper on the bottom, slightly formal look, definitely used as a dining room.
Formal Dining Room from listing
Formal dining room AFTER:
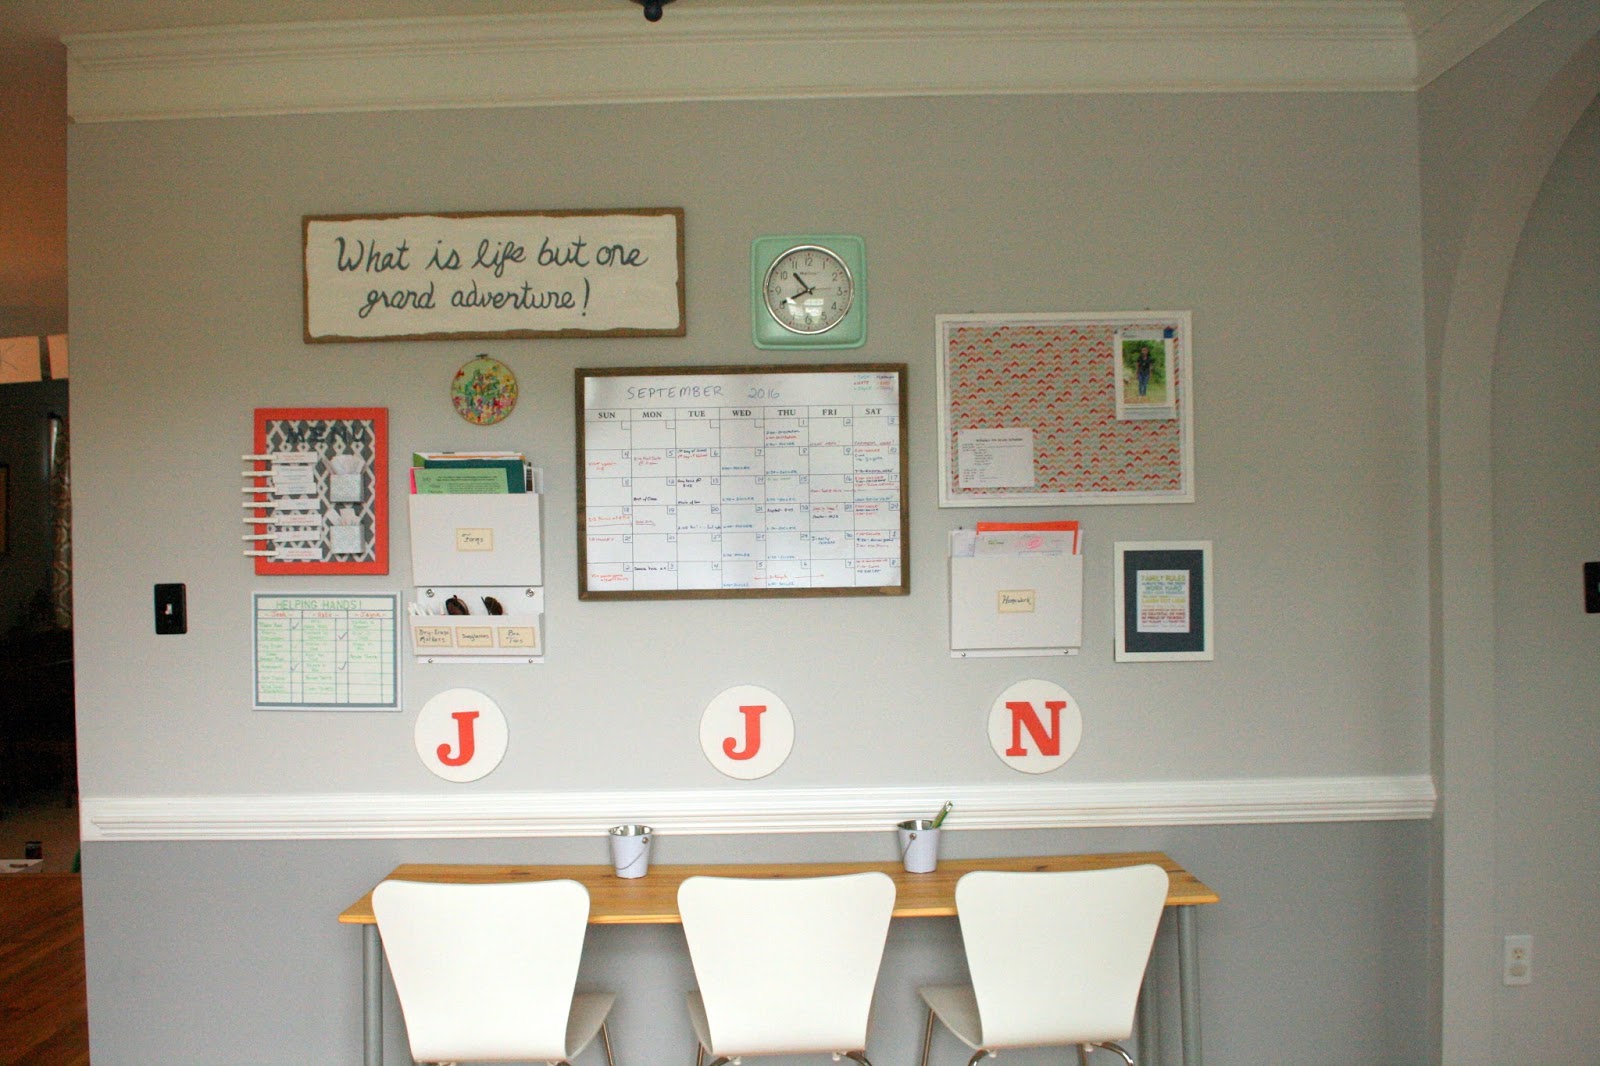
Our playroom! Light grey on top, medium grey on the bottom, lighter colored rug, custom made art by my son, an etsy find and my talented sister-in-law. Desk created by yours truly and my oldest. Command center wall - an assortment of really cheap finds transformed by spray paint, different textures/patterns and re-vamps of previous DIY projects.
Playroom : Coral and mint bins from Wayfair. (Another shout-out to my in-laws, husband
and oldest for helping strip the wall paper and sand the walls.)
Command Center wall with homemade desk.
Most elements on the wall were re-purposed or spray painted cheap finds!
View from kitchen of desk area - I chose a long, thin style to keep ample room for
the boys to run around the circular layout and because they don't really need a deep desk.
My oldest walked in to the room this week once we finally had the desk done and the chairs in and said "Mom, this is my favorite room you've ever decorated. I could stay here all day."
If you want to know how I did any of the projects on the wall or created the desk, just let me know!
His brothers, drums, legos, soccer, science and Star Wars.
So, a few years ago, when we were finally ready to admit that it was time to move on from the bedroom of his younger years, he started dreaming. He looked through google images, he went with me to find artwork, he picked out his own comforter. He let me create some art for him (to save us a bundle) and he even helped me with painting the room.
It was a truly delightful project.
We did most of it in Wisconsin so when we were moving I had to ask.
"Do we keep it the same? Do you want to change anything?"
"Mom, this time I want the drums in my room. And I'M going to unpack and put things where I want them."
Well, of course he did. So.
Without further ado, I'm sharing the fun room we enjoyed dreaming and implementing. We added in some new touches after we moved.
Here is what the room looked like when we bought the house (as per the listing picture):
Bedroom in Listing
And here is what it looks like now:
Because why wouldn't a storm trooper have drumsticks?
Science Corner
Brand new bed and art over it created by yours truly
Drums loaned by my amazing friend, Tiff and a dresser befitting a big kid